Clean Architecture: Implementation Using Quarkus + Gradle Multi-Project. Part 1
🎉 Greetings, fellow coders, pixel painters, and algorithm architects! Ready to dive into a coding adventure that's as epic as a fantasy quest? 🏰🐉 Well, grab your keyboards and virtual helmets, because we're about to embark on a journey that's going to reshape the way you think about software development. Welcome to the realm of "Clean Architecture with Quarkus + Gradle Multi-Project Build + Java 17" – where the code is clean, the architecture is unbreakable, and the possibilities are endless!
Unveiling the Code Enigma: Clean Architecture
Imagine your code as a magical realm, and at its core lies the secret to crafting applications that stand tall against the test of time. 🕰️🔮 That secret is none other than Clean Architecture, a set of principles that keep your codebase organized, adaptable, and ready for whatever challenges the digital realm throws at it. Like master wizards, we'll be separating concerns and building layers that aren't just lines of code, but a symphony of functionality, resilience, and future possibilities!
But what's an epic adventure without the right tools? 🛠️ Introducing Quarkus, the turbocharged, hyperdrive-powered framework that's set to revolutionize your coding journey. Imagine if your code had the agility of a ninja and the speed of a cheetah, all while sipping on a cup of supercharged espresso – that's Quarkus for you! It's your trusted companion in this quest, ensuring your codebase is not just strong, but lightning-fast and adaptable enough to conquer any challenge.
This Guide Covers
- Gradle Multi-Project: Autodiscovery Modules
- Clean Architecture Skeleton
- Quarkus Features
- Functional Testing
- Native and JVM Packaging
Prerequisites
- Gradle 8.1.1+
- Java 17
- Docker
Setting Up the Project
To begin, let's create a blank canvas where our masterpiece will take shape. Fire up your favorite integrated development environment (IDE) or text editor, and create a new Java Gradle project. We're gearing up for a coding symphony, and our project will be the stage where the magic happens.
Preparing plugin versions and common gradle variables
To make our life more easy, let's create a file in your project's root directory called: gradle.properties and add these properties:
Enlisting the Helpers: Gradle Plugins
Every hero needs their sidekicks, and in our coding adventure, these sidekicks are plugins. We'll enlist the help of three awesome plugins:
io.freefair.lombok
,
org.kordamp.gradle.jandex
, and
io.quarkus
.
#Quarkus Properties
quarkusPluginId=io.quarkus
quarkusPluginVersion=3.2.3.Final
quarkusPlatformGroupId=io.quarkus.platform
quarkusPlatformArtifactId=quarkus-bom
quarkusPlatformVersion=3.2.3.Final
#Build Properties
lombokVersion=6.6.3
jandexVersion=1.1.0
Add these plugins to your build.gradle
file, and it should look something like this:
plugins {
    id 'java'
    id 'io.quarkus' version "${quarkusPluginVersion}"
    id 'io.freefair.lombok' version "${lombokVersion}"
    id 'org.kordamp.gradle.jandex' version "${jandexVersion}"
}
Managing the Magic: Module Autodiscovery
Add the next block of code at the end of your
settings.gradle
file:
fileTree(rootProject.projectDir) {
    include '**/*.gradle'
    exclude 'build', 'buildSrc', '**/gradle', 'settings.gradle', '/src', '/build.gradle', 'out'
}.forEach { module ->
    String name = module.parentFile.name
    String path = ':'.concat(name)
    include path
    def subproject = findProject("${path}")
    subproject.name = module.parentFile.parentFile.name.concat('-'.concat(name))
    subproject.projectDir = module.parentFile
    subproject.buildFileName = module.name
}
This block of code dynamically creates subprojects in a Gradle multi-project setup based on the directory structure and included files. It iterates through
.gradle
files in your project directory, constructing subproject paths, customizing subproject names, and configuring their directories and build file names. This dynamic setup is like building your own orchestra, with each subproject playing its part in our coding symphony.
Syncing the Planets: Gradle Sync
With the configuration added, it's time to sync the planets! In your IDE, find the option to sync or refresh your Gradle project. This will make sure that all the changes we've made in the
gradle.properties, build.gradle and settings.gradle
files are brought to life.
And There You Have It!
Congratulations, fellow coder! You've successfully set up the foundation for our Clean Architecture masterpiece. With the MavenCentral repository, Lombok, Jandex, the mighty Quarkus plugin, and the magical plugin management in your settings, you're armed and ready to tackle the coding challenges that lie ahead. 🚀🔥
You can find the code of this section in the branch: steps/1-setting-up-the-project
Defining the Layers
Now that we've set up the foundation of our project and understood the tools at our disposal, it's time to dive into the heart of Clean Architecture – the layers. Think of these layers as the building blocks of a well-structured, maintainable application. Each layer serves a distinct purpose, ensuring that your codebase remains organized and adaptable to changes. Let's explore these layers in detail:
Quarkus Takes the Stage: In our Clean Architecture implementation, Quarkus shines as a framework that excels in this role. It handles HTTP requests, manages database connections, and seamlessly integrates with various external systems. Quarkus empowers us to build APIs and connect to databases without compromising the integrity of our core business logic. This layer serves as the bridge between our application and the ever-changing external landscape.
Shared Gradle Configuration: Setting Up the Core
Now that we've explored the foundations and layers of Clean Architecture, it's time to delve into the heart of our Gradle setup – a code block that orchestrates the shared configuration across all subprojects. This orchestration is what binds the entire architecture together, ensuring consistency and harmony as we build each component.
allprojects {
    repositories {
        mavenCentral()
    }
}
subprojects {
    apply plugin: 'java'
    apply plugin: 'org.kordamp.gradle.jandex'
    apply plugin: 'io.freefair.lombok'
    dependencies {
        implementation enforcedPlatform("${quarkusPlatformGroupId}:${quarkusPlatformArtifactId}:${quarkusPlatformVersion}")
        implementation 'io.quarkus:quarkus-arc'
        implementation 'io.quarkus:quarkus-mutiny'
    }
    java {
        sourceCompatibility = JavaVersion.VERSION_17
        targetCompatibility = JavaVersion.VERSION_17
    }
}
This code block might look complex, but fear not! It's the maestro of our project's harmony, ensuring that every subproject adheres to the same tune. Let's break down what's happening here:
- Shared Plugins: We start by applying essential plugins to every subproject. The
'java'plugin makes Gradle aware of Java source code, while'org.kordamp.gradle.jandex'and'io.freefair.lombok'ensure that indexing and Lombok's magic are available across the board. - Shared Dependencies: Just as the layers of Clean Architecture are interdependent, our subprojects need common dependencies. This section ensures that every subproject enjoys the Quarkus goodness. The
enforcedPlatformdependency enforces consistency, preventing any rogue versions from sneaking in. - Java Source and Compile SDK: To ensure compatibility and avoid unexpected surprises, we specify that our source code and compiled output will adhere to Java 17. This ensures that our entire codebase stays modern and cohesive.
By including this code block in our project, we're fostering a unified ecosystem. Subprojects share plugins, dependencies, and compilation settings, allowing us to work on different components while maintaining a cohesive architecture.
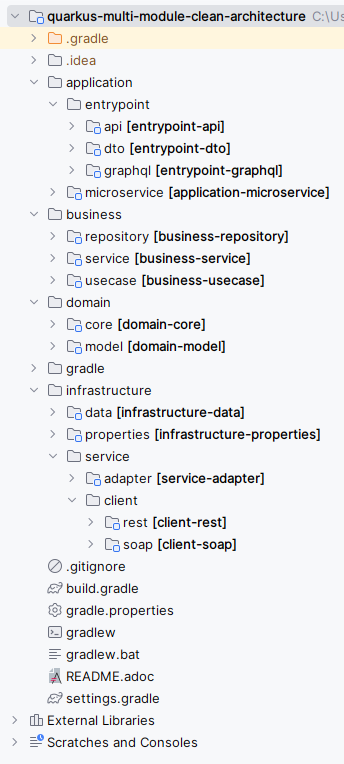
Structuring Our Clean Architecture Project
To ensure our project remains organized, maintainable, and scalable, we're going to structure it using the principles of Clean Architecture. This directory structure defines the boundaries of our components and enforces the separation of concerns that Clean Architecture champions.
clean-architecture-project
├── application
│   ├── entrypoint
│   │   ├── api
│   │   ├── dto
│   │   └── graphql
│   └── microservice
├── business
│   ├── repository
│   ├── service
│   └── usecase
├── domain
│   ├── core
│   └── model
└── infrastructure
    ├── properties
    ├── data
    └── service
        ├── adapter
        └── client
            ├── rest
            └── soap
This directory structure mirrors the layers of Clean Architecture, creating a clear separation between the different concerns of our application. Let's break down each module:
- Application: This module contains the entry point for our application. It houses the API controllers for serving microservices endpoints, the shared DTOs for standardized API operations, and the GraphQL builder for GraphQL support.
- Business: The business module hosts the core of our application's business logic. It's divided into three submodules:
repositoryfor accepted persistence operations,servicefor integrated external service operations, andusecasefor business use case operations. - Domain: The domain module is the heart of Clean Architecture. It includes the
coresubmodule, which implements the use cases running the business logic, and themodelsubmodule, which contains shared domain models and utilities. - Infrastructure: This module handles the integration logic with external and internal components. It's further divided into
propertiesfor environment properties mapping,datafor database persistence logic, andservicefor external integration logic. Theservicesubmodule includesadapterfor Java-library integration adapters andclientfor clients' request/response logic, tailored for REST and SOAP APIs.
By structuring our project in this way, we're ensuring that each component remains focused on its specific responsibilities while fostering a modular, maintainable architecture. In the upcoming sections, we'll explore how these modules interact, how dependency injection keeps them aligned, and how comprehensive testing maintains the integrity of our architecture.
Building the Foundation: Gradle Setup for Each Submodule
In our journey toward a well-structured Clean Architecture project, the devil is in the details. As we've defined the directory structure that aligns with the principles of Clean Architecture, we must also ensure that each submodule has its own individual Gradle setup.
We achieve this by creating an empty
build.gradle
file in each submodule directory. This file will serve as a placeholder for defining module-specific configurations, dependencies, and build tasks.
For example, let's consider the
application/entrypoint/api
submodule:
- Navigate to the
clean-architecture-project/application/entrypoint/apidirectory. - Create a new file named
build.gradle.
Repeat these steps for every submodule within your project.
Syncing the Harmonious Orchestra: Gradle Sync
With our individual
build.gradle
files in place, it's time to synchronize our project. Gradle sync is the conductor that brings our harmonious architecture to life. It ensures that dependencies, configurations, and tasks from each submodule are coordinated, resulting in a seamless orchestration of our codebase.
In your IDE, find the option to sync or refresh your Gradle project. As Gradle sync completes, watch how each submodule's configurations are harmonized, and the full architecture takes shape.
Setting Up Java Source Directories
With our Gradle setup in place and the submodules defined, we're ready to infuse life into our architecture by adding the Java source directory structure. This structure ensures that our codebase remains organized, our components have their designated places, and the boundaries of Clean Architecture are maintained.
Java Source Directory for Each Module
For each submodule in our architecture, we'll create the corresponding Java source directory structure. This structure provides the canvas upon which our application's masterpiece will be painted. Let's get started:
- Navigate to the root directory of your Clean Architecture project.
- For each submodule (e.g.,
application/entrypoint/api,business/repository,domain/core,infrastructure/data, etc.), create a Java source directory namedsrc/main/java. This is where your Java source code will reside.
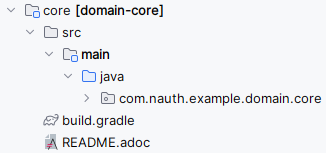
For example, let's consider the
application/entrypoint/api
submodule:
- Navigate to the
clean-architecture-project/application/entrypoint/apidirectory. - Create a new directory named
src. - Inside the
srcdirectory, create another directory namedmain. - Inside the
maindirectory, create a final directory namedjava.
Syncing the Project: Gradle Sync
After setting up the Java source directory structure, it's time to sync our project once again. Follow the same steps as before to trigger Gradle sync through your IDE.
As the project syncs, you'll witness the cohesion between your source directories, the submodules, and the overall architecture.
Organizing Java Packages for Each Module
Now that our project structure is taking shape, let's zoom in on the heart of every module – the Java packages. Just as Clean Architecture emphasizes the importance of separating concerns into distinct layers, organizing our code into coherent packages within each module is essential for maintaining clarity and modularity.
Defining Java Packages for Each Module
As our project continues to flourish within the realms of Clean Architecture, an essential aspect we must emphasize is the uniqueness of our Java base packages. Each module, with its distinct set of responsibilities, should have its own exclusive space in the codebase to prevent confusion, conflicts, and tangled dependencies.
Just as Clean Architecture promotes separation of concerns and modular design, unique Java base packages offer an organized playground for each module to thrive. With distinct base packages, our codebase transforms into a symphony where every instrument (module) knows its role and remains in perfect harmony.
For each submodule, we meticulously create a Java base package that reflects its identity within the architecture. This ensures that no two modules share the same space, preventing namespace collisions and guaranteeing clear boundaries.
Here's how you can create the Java base package for each module:
- Navigate to the root directory of your Clean Architecture project.
- For each submodule (e.g.,
application/entrypoint/api,business/repository,domain/core,infrastructure/data, etc.), create a Java package structure based on your base groupcom.nauth.exampleand the module's name.
For example, let's consider the
application/entrypoint/api
submodule:
- Navigate to the
clean-architecture-project/application/entrypoint/apidirectory. - Inside the
javadirectory, create a package namedcom.nauth.example.application.entrypoint.api.
Repeat these steps for every submodule within your project.
Syncing the Project: Gradle Sync
After defining the Java packages for each module, it's time to synchronize our project once again. Gradle sync ensures that our new package structures are recognized, and our architecture remains harmonized. Initiate Gradle sync through your IDE, following the familiar steps.
You can find the code of this section in the branch: steps/2-defining-the-layers